Friday, 26 February 2010

Giveaway winners!

It's time to announce some winners!  Thank-you everyone who took the time to say hello, and to those who suggested such wonderful names.  As there was such cosy number of entrants I decided to draw names the traditional way.  So I wrote all your names down...


Then I popped them all in a large cup...


Then I enlisted some help picking out a winner...


And Lillia picked...

Congratulations to Smbumblebee!  The doll is yours and will be on her way as soon as she has packed up her borscht recipes and her Russian ballet DVDs.  But she will need a name for her passport.  The suggestions were all marvellous and a few really made me smile, I really wish I could send a gift to each of you, truly, in fact I probably would if I didn't have hubby to talk me down to earth!

But in the end, after much debate, there was one name that all three of us agreed on...Valentina, suggested by Pea Green Kitty, after the first woman in space Valentina Tereshkova, who was Russian and, it would appear having googled her, pretty cool.  Before she was an astronaut she was a textile-factory assembly worker and an amateur parachutist!  How could I not choose to name her after such a woman!  So thank you Pea Green Kitty for such a great suggestion, a runner-up prize will be on its way to you! 

If both winners could please email me (address in my profile!) with the address they would like their parcels sent to that would very handy :)

Ah.  I feel better for getting ready to send some gifts out into the world.  It's been a long tough week but it has all been worth it.  Yesterday I managed to bag myself a new job in the organisation I work at - a job that will allow me to work more flexibly and be there more for Lillia when she starts school.  It has always been so important to me that I would be there every day, well almost every day, to pick her up from school.  Now I will be able to. 

My heart is full :)
Valentina

Thursday, 25 February 2010

Marshmallow Butter Cookies

I need to let you know the winner of my giveaway I know!  And I will, tomorrow though.  Today I had to dash in to share with you this recipe.


I had been working at home yesterday, my little one was poorly so I needed to be here to take her to the doctor's.  Bless her, no matter how ill she is she still desperately tries to be cheerful and make us laugh.  We got back in the afternoon after the doctor's verdict of "just a virus" and she settled down for a spot of DVD watching (Madagascar!) with Granny whilst mummy got an hour more work done.

I felt I needed to do some domestic-wifely earth-motherly activity to decompress from all the harrassed-working-mother activity.  Plus I needed something that would go nicely with my well-earned cup of tea.  So I went to the Blue Book - an old A4 spiral notebook stuffed full of recipe cuttings that I have kept for as long as I can remember.  Somewhere near the back I found a tiny recipe cutting for some nutty butter cookies - I had every ingredient but the nuts, but who needs nuts? 


This recipe was an old clipping, from some magazine in the distant past, so I can't credit it to anyone.  But it's just too good not to share...

Here's what you need:

100g butter (room temperature)
100g caster sugar
50g of demerara sugar
1 large egg (I used extra large)
250g self raising flour

Here's what to do:

Beat the butter and sugars together until soft and kind of creamy, then beat in the egg until the mixture is all nice and smooth. Then mix in the flour with your hands to form a dough.  Shape the dough into walnut size balls, flatten them slightly with your hands then pop them onto a baking sheet lined with greaseproof paper, leaving room for them to spread.  Use a fork to further flatten them.
 
Pop them in a preheated oven at 180c for 12 minutes (just enough time to clean up and make a cuppa.) Leave them to cool on the tray for a few minutes...if you can wait that long.
 
And if you want an even bigger sugar high...
 

Whack some mini-marshmallows into the mix for a sticky squidgey cookie feast!


Mmmmm :)

Wednesday, 24 February 2010

My bedroom

The light was good, which is rare at this time of year in our North West facing house, so I snapped a few shots of some of the things around my house that make me happy.

I love our little house, it is 110 years old and when we bought it nothing had been done to it in over 20 years, nothing except bodges and rubbish DIY that is.  There isn't a single original feature left, the previous owners even sold the Victorian window pillars!  We basically gutted it and started from scratch, carefully rebuilding, improving, sanding, plastering and painting it back to life.

Today I thought I would share with you some glimpses of our bedroom, just some pictures of things I love. 

Here are my two favourite matryoshka dolls, the ones I just couldn't quite part with, sitting on the bedframe injecting a little colour...


The photo above the bed is one of two taken on our honeymoon in the Maldives six years ago.  This one is the one I took of a Maldievien dhoni.  You can't see the other one in this photo unfortunately, I will have to share it another time. The wooden acorn hanging on the bed post was my gift to hubby on our fifth wedding anniversary (wood) and is supposed to represent good luck and good health.  I bought it from here.

On my bedside table, aside from an alarm clock, some lemon squash and a few books, are these...


A sparkly pot for holding my earplugs (hubby Snores with a capital S) and an amethyst, which is supposed to reduce nightmares and aid creative thinking, and of course it looks pretty!

Then there are my shelves, the ones that took hubby nearly an entire day to put up and made us both decide that we would never buy "floating" shelves again...


But they do look good and they hold some lovely things.  The picture on the left of the top shelf is a watercolour bought from an artist in the South of France last year. I love the colours of this picture, though the bedroom is a temporary home before it moves downstairs to the living room where its colours will fit better.  The statue of Amitabah was a gift from my sister at Christmas and the maraca behind was a gift from my grandad over 20 years ago.

The picture top right was made by my sister as a wedding present, she cross-stitched the lyrics we had on our orders-of-service...


The words are from the song at the end of The Nightmare Before Christmas and we thought they were ideal for our wedding. (Click on the picture to make it bigger if you can't quite read the words!)

The mosaic is one I did in 2008 at Nathalie Vin's weekend course in London...


This close-up really sums up the colours and the feel of how we want our bedroom to be - like a restful, tranquil beach hut somewhere peaceful!  Oh, and the beautiful postcard just to the right on top of the basket is from Kellie at 74LimeLane (more on her beautiful work another time..!)

In the window a crystal...


In feng shui a crystal hung in a window is supposed to lighten the "chi" of a room, but I just like the way it sparkles!  But any lighening of chi is a definite bonus.

So there you have it!  Some very small glimpses of my bedroom and some of the things that make me feel happy :)

x

Monday, 22 February 2010

Visiting my sister

Sorry for my slight absence, I've had a busy few days driving up to Birmingham to visit my sister.  It's a three-hour drive up from Kent so plenty of motorway time to crack on with the ripple blanket I'm making for Lillia's 4th birthday (next month..where did those four years go.?)


Lots of lovely ripples to take my mind off the lorries and the numpties on the m25...


This was the first time we have seen my sister's new house, which she bought with her boyfriend last year...


It was very flattering to see some of the things I have made for her scattered throughout!  I mosaiced this mirror for her at the beginning of last year...or was it the year before.?  Anyway, it was for her birthday some time in the last couple of years.


I remember really enjoying making this one, I love working with ceramic and china.

For her birthday this year though I made something very special indeed, which I was pleased to see had been given pride of place...


Yes, every toilet needs one.

Gertruda is also very happy in her new home on the fireplace...


Gertruda is the chubbiest of my matryoshka dolls so far so I am glad to see she has some cake to keep her going. (Incidentally the cake and the donut were knitted by our very clever mother!)

It was very exciting to see all these things on display. But my excitement was nothing compared to that of my sister's and Lillia's about the arrival of some new residents...


Rescued from slaughter, these ex-battery hens will now live out their days in my sister's garden.  They will reside in this chicken palace and have the run of the garden...


This one, "Chico", is quite the poser...


And on their first day in their new home they even provided some eggs for breakfast!


My sister has always been a bit animal nutty and these chickens aren't the only tenants of her garden, meet Wilf and Caster...


And inside there are numerous tropical fish.  My favourite is Harry, he has Irritable Bowel Syndrome and gets stuck upside down when he gets wind...


Bless him.  There are also guniea pigs but they were too quick for my camera I'm afraid!  One fellow who wasn't too quick though...


No not in my sister's garden (though I wouldn't be surprised!) but at the local animal centre.  Lillia loved this Lemur, who she thought was the actual King Julian from Madagascar. 

We had a great time visiting the animals but thanks to a few inches of snow overnight the cold soon beat us and we had to retreat to the warmth of the cafe and hot chocolates before indulging in some light snowball fighting, which Lillia was quite frighteningly good at...


She has a very accurate shot!

We finished off with some stargazing. My sister's boyfriend has a proper telescope and treated us all to incredible views of the moon.  Here's Lillia having a look...


Check out her ladybird mittens!  Crocheted by yours truly and soo very cute, but more importantly warm and washable!

We drove home today via the Cotsowlds, which was utterly beautiful, like detouring through a winter wonderland.  We are now all cream-crackered, so it's a glass of wine and a homecooked pizza for me then a very early night!  I will wish you goodnight with my, not so incredible, photo of the moon...


Night night x

Oh and by the way thanks to everyone so far who has entered my giveaway!  Thanks so much for taking the time not only to comment but to say such reassuring things.  The names being suggested are fantastic!

Thursday, 18 February 2010

My first giveaway!!

My daffodils are blooming rather nicely and I am feeling in a rather generous mood today...


I hope you enjoyed my first ever tutorial on Monday?  I see some of you have even made yourself your own dolls already!  You've certainly been busy! It's been lovely to see them popping up.

I have another "first" today - my first giveaway!  I am both very excited and nervous about doing this.  Excited because I love to package up parcels of goodies and send them off to people.  But nervous in case nobody is interested!   But this has already been a week of putting myself out there and taking some chances, one of those bowel clenchy weeks where decisions are taken, paths are chosen, changes are afoot and the air is ripe with hope for the future.  So here goes...!

In writing my tutorial over the weekend my latest doll was created.  Here she is...


Isn't she pretty?  Pretty but, alas, nameless!  So here's what you need to do - leave me a comment on this post before midday next Wednesday (24th February).  I will then do a random number picker thingy to pick a winner who will receive this doll as their prize.  You only need to give me a hello and a wave in your comment BUT! if you suggest a name for this doll I will award a runner-up gift to the commenter whose suggestion I like best!

Good luck everyone!  I hope I don't only get two comments from my mum or something.. ;)

x

Monday, 15 February 2010

Matryoshka Doll Tutorial

After all the fun I had making my matryoshka style dolls a couple of weeks ago I thought it would be mean not to spread the fun a little. So I am going to do my first ever tutorial and try to share with you how to make one!


I have tried to be nice and clear, use lots of pictures and not to over-explain things (as I have a tendency to do) but do let me know if anything can be improved. When I was first starting out with mosaics and sewing and crochet I was desperate for free simple tutorials that made sense so constructive criticism will be most welcome and I promise not to sulk ;)

Right, lets get started…

Snipsnaphappy’s matryoshka doll tutorial

You will need:
  • 1 A4 size (about 21x30cm) piece of felt in the colour of the main body of your doll
  • 1 A4 size piece of felt in the colour of the hood of your doll
  • Some small scrap bits of black or brown felt for the hair (or red, yellow, green or whatever colour you like!)
  • Fabric for the face – I use a lovely light canvas hemp fabric (which I buy from Hemp Fabric UK) but some plain cream cotton or linen would do just as well
  • Paint for the face (I use acrylic)
  • Ribbons, trims, buttons and bits for decoration
  • Stuffing (not the sage and onion kind)
  • Embroidery threads for the visible hand-sewing
  • Plain thread for hand or machine sewing your finished pieces together
  • Scissors
  • Fabric glue if you intend on gluing your embellishments.

First you need to cut all your pieces. I have done a PDF for you with the shapes you need.  As I can't work out for the life of me if it is possible to somehow upload this to Blogger I have popped it on Scribd.  Click here to go get it.  This pattern is hand-drawn and a little rough round the edges but it should help you get the job done :)  Do let me know if you have any problems retrieving this.

[Edited on 15th May 2011 to add: after repeated problems with the original host for the template I have now moved the document to Google docs!  Click on this link to go straight to the document.  If you have problems please do let me know via email or by leaving a comment or tweeting me. Have fun!]
For the front hood, fold your felt in half then pin the pattern piece with the dotted line along the fold…


Cut out the pattern and voila! A nice symmetrical shape.  To cut out the hole for the face in the front part of the hood fold the felt in half, position the semi-circle and pin…


Then carefully cut out your hole…

A seam allowance of about half a centimetre (ish..) is included on all the pieces so when you position the semi-circle make sure you leave enough space at the top for when you come to sew it all together later.

Now cut out your body pieces and the back hood piece...


Now it’s time for some decorative sewing, the fun bit! First we will sew the face to the front hood. I use an embroidery hoop for this but you can do it whichever way you find easiest.

Pop your face fabric into the embroidery hoop and pin the front hood piece of felt to it. Sew a running stitch all the way round the face in a nice contrasting embroidery thread...


For the hair I tend to use scraps. You can use the semi-circle as a guide for the top edge of the hair.  Cut a nice wavy style with a centre-parting…


Or maybe a side swept look…


Or something a little more funky…


Sew the hair on with matching thread. When that’s done remove it all from the hoop. I then cut the face fabric behind the felt…


Now it’s time to pin your front and back hood/head pieces onto the body pieces. This takes a bit of fiddling about to make sure the positioning is correct – pin the front hood piece to the front body piece, then do the same with the back pieces, then line them up to check they will all match up when you come to sew them together, adjust if need be.

All pinned and in position? Good.

Use a running stitch again to stitch the front head piece to the body, and the back head piece to the back body…

Now it’s time to embellish, yay! There are many options – you may wish to add a jaunty tie to the hood, or a trendy button, or both!  And your doll will need a pretty flower, or apron on her front.  Play about and see what you come up with...

Pretty!

Now pin your completed front and back pieces together, ensuring that the edges of the hood meet up...


Time to sew – you can hand sew or machine sew – all around the edges leaving about half a centimetre seam.


Leave a gap at the bottom for turning.

Snip around the seams on all corners and bends as close to the stitches as is safe to do so...


Now the best bit – turn your doll out and watch her personality unfold! I use a chopstick to poke out all the curves and corners...


She's taking shape!


I like to add a little tag made with ribbon...


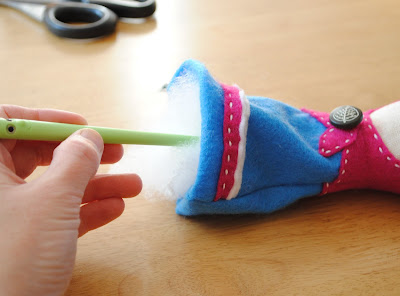
Now stuff your doll with your chosen stuffing until she is nice and firm, but still squidgy...


Use ladder stitch to close the opening...


Time to give your new friend some eyes and a little rouge...


TA DA! One new friend...


I hope you enjoyed this tutorial and go on to make yourself a lovely doll.  Please be good and don't sell anything you make from this tutorial, make as many as you like for your friends and family though, and please let me know how you get on! :)

x